Saturday, December 17, 2011

Cranberry Bliss Bars

Cranberry Bliss Bars


Have you ever stared through the glass case at Starbucks, longing after those luscious cranberry covered beauties, while thinking, “I’m already spending $5.00 (not to mention the calories!) on my coffee...”, so you passed over them while they called your name, beckoning you to return?  I know I have.  I am so proud of myself every time I ignore those crimson jeweled triangles as they whisper, “Chelsea, Chelsea”.  But I could resist no longer.  This year I had to cave.  So instead of giving into the tart and tantalizing triangles behind the Starbucks case, I made some of my very own!  Now I can have them with my coffee every day (perhaps I should have told people a size larger when I mentioned clothing for Christmas…)!  If you love cranberries, please make these.  I promise they will make your mouth sing and your soul feel glad this Christmas season.  I found the blondie recipe from Taste of Home.  I appologize I do not have any process pictures; I was slacking...but here is what I did to construct this delectable Christmas treat:

Ingredients

Blondies
¾ Cup butter
1 ½ Cups light brown sugar, packed
2 Eggs
¾ Teaspoon vanilla
2 ¼ Cups flour
1 ½ Teaspoons baking powder
¼ Teaspoon salt
1/8 Teaspoon cinnamon
½ Cup dried cranberries, roughly chopped
6 Ounces white chocolate chips

Frosting
4 Ounces butter, softened
4 Ounces cream cheese, softened
2 Cups powdered sugar
1 Teaspoon vanilla

Topping
½ Cup dried cranberries, roughly chopped
4 – 5 Ounces white chocolate chips
Zest from 1 orange

Step 1
Preheat the oven to 350 degrees.  Prepare a 9 x 13 pan by spraying with cooking spray.  I also put parchment paper into the pan, cut large so that it hung off the sides, so I could remove the blondie bar from the pan easily when it had cooled.  Just press it against the spray so it sticks to the pan, and then spray the top of the parchment for good measure. J

Step 2
Melt the butter for the blondies and combine it with the brown sugar.  Allow it to cool enough that it won’t scramble your eggs.  Then add the eggs and vanilla and let them combine with the butter mixture.  Then add the flour, baking powder, salt and cinnamon and mix until they are just combined.  Then add the cranberries and chocolate.

Step 3
Spread the batter in your pan and bake the blondies for 18 – 22 minutes (mine took closer to 22), or until a toothpick inserted in the center comes out clean.  Let them cool on a wire rack, OR, if you are like me and are utterly impatient, throw them in the fridge to cool for awhile!  But don’t be like me.  Patience is a virtue, don’tcha know?

Step 4
Prepare the frosting by beating the cream cheese and butter together.  Then add the powdered sugar and mix until it is creamy.  Then add the vanilla.

Step 5
Remove the blondies from the pan if you want to be fancy, or just leave them in the pan.  Either way, go ahead and frost them!  Then sprinkle the ½ cup of chopped cranberries on top.

Step 6
Using a double boiler, and making sure the boiling water does not touch the bottom of your chocolate bowl or pan, melt the white chocolate with the orange zest.  When it has melted, drizzle it on top of your blondies.  When the chocolate has cooled, you can slice the blondies into rectangles, triangles…or heck…just eat the whole pan!  They are THAT GOOD! J


Merry Christmas, my fellow foodies!

Monday, December 5, 2011

Black Bean Soup

Black Bean Soup


It’s December!  Where has 2011 gone?  It feels like just a couple months ago we were celebrating Independence Day with hot dogs and fireworks, but here we are…in the throes of Christmas preparations (and I’m loving every minute of it!).  After the delicious, but oh-so-un-waist-friendly Thanksgiving festivities and in between the thigh dwelling Christmas cookies, I decided dinner should be something healthful yet hearty.  I absolutely love Panera’s black bean soup and decided to create a knock-off of it to provide a flavorful, filling and low calorie dinner option!  Boy was it a success!  Lots of flavor, while fantastically low calorie.  Served with some baguette slices and a salad, you’ve got yourself a meal!

Ingredients
Olive oil
2 Onions, chopped
¾ Cup carrot, chopped
2 Ribs celery, chopped
1 Poblano, seeds removed and chopped
8 Cloves garlic, minced
4 Teaspoons cumin
2 Jalapenos, chopped – seeds removed if you don’t want the heat
4 15-to-16 oz. cans black beans, undrained
2 15-oz. cans petite diced tomatoes in juice
3 Cups low sodium chicken stock
2 Tablespoons cilantro, plus more for garnish

Step 1


This recipe begins as most of my recipes do, with vegetable prep!  Go ahead and chop the onions, carrot, celery, poblano, garlic and jalapenos. 


When it came to the jalapenos, I decided to remove the seeds from one and not from the other.  I like some heat, but not too much.  But you can do whatever your little heart desires!  Oh, and while you’re at it, you might as well chop the cilantro for later too.

Step 2


Heat about 3 tablespoons of olive oil in a large pot over medium-high heat.  Add the onion, carrot, poblano and celery.  Sauté the vegetables for about 6 minutes, or until they begin to soften.  Then add the garlic and sauté for 1 minute.  Mix in the cumin and jalapenos. 


Then add the beans, tomatoes and stock and bring the soup to a boil.  When it boils, reduce the heat to medium and cover for about 15 minutes, or until the carrots are softened.  Add the cilantro.

Step 3


Remove the soup from and heat.  Take about 5 cups of beans and vegetables from the soup (it's okay to get some of the liquid too) and set aside.  Then use an immersion blender, blender or food processor to puree the rest of the soup until it is smooth. 


Combine the puree and whole vegetables in the pot again and simmer another 15 minutes, uncovered.  Season with salt to taste and serve with a cilantro garnish.


Enjoy!  Happy shopping and cookie baking!

Monday, November 21, 2011

Cauliflower Gratin

Cauliflower Gratin


Thanksgiving is almost here!  You probably already have your menu planned, but if you’re like me…one particular side dish is an after thought.  The turkey, the stuffing, the potatoes…they are all center-stage.  Then, there’s the vegetable.  You have to have it.  What kind of nutritious meal would it be without at least one vegetable on the table?!  But, you don’t really care what it is or how it is prepared.  This Cauliflower Gratin revolutionizes my Thanksgiving table.  Instead of seconds of the stuffing and potatoes, I’m reaching for more of this cheesy cauliflower dish.  What makes it so special?  Gruyere.  Period.  That is what makes this vegetable dish a rock star at the table.  The nuttiness of this cheese puts this dish over the top.  Give it a try and I think you will agree.  The recipe is basically followed from Ina Garten’s, but I did give it a few tweaks.  So here is my rendition…and maybe you will agree that the veggie will win best of show at the table this year!

Ingredients
2 (3 lbs. each) heads of cauliflower
Kosher salt
8 Tablespoons butter
6 Tablespoons flour
4 Cups hot milk (I used 2%)
1 Teaspoon pepper
¼ Teaspoon nutmeg
1 ½ Cups Gruyere, grated
1 Cup Parmesan (freshly grated is best)
½ Cup panko bread crumbs

Step 1
Preheat the oven to 375 degrees.  Using a stock pot, put hot water on the bottom and put it on the burner over medium-high heat.  Then prepare the cauliflower by cutting it into large florets.  When the water in the stock pot is boiling, put half of the cauliflower into the steam basket.  Cover and steam the cauliflower for 6 minutes.  Put the cauliflower in a bowl and steam the rest for another 6 minutes.

Step 2
Grate your Gruyere and parmesan, so they will be ready when your sauce is finished.  Also, place the milk in the microwave and let it heat for a couple of minutes, until it is hot.

Step 3
Next, melt 4 tablespoons of butter in a large saucepan over medium low heat.  When it has melted, add the flour and whisk constantly, cooking the roux for about 2 minutes.  Pour the hot milk into the roux and whisk it to combine into a smooth mixture.  Bring the sauce to a boil, for about 1 minute, until it thickens.  Then remove it from the heat and add 2 teaspoons of salt, the pepper, nutmeg, 1 cup of the Gruyere and the parmesan.  Mix it just to melt the cheese and combine the sauce.  At this point, I taste it to make sure it is the way I want it.

Step 4
Pour 1/3 of the sauce on the bottom of a casserole dish.  Place the cauliflower on top of the sauce and then pour the rest of the sauce evenly over top.  Note:  At this point, you can put the dish aside and finish right before you are ready to bake it.  It makes a great do ahead veggie!!!  When you are ready to bake it, combine the bread crumbs with the rest of the Gruyere and sprinkle them evenly over the top.  Melt the remaining 4 tablespoons of butter and drizzle it over the the bread crumbs.  Bake the gratin for 30 -40 minutes, or until the top is golden brown.

Gastronome's Note:  The cauliflower will still be a little firm, which is how I like it.  You can obviously steam it longer in the beginning if you prefer more mushy...errr...well done.

Saturday, November 12, 2011

To Stuff or Not to Stuff...that is the Question

Pear and Sausage Stuffing


I am, against my better judgment, going to highlight the Thanksgiving dish that is the center of eternal debates.  I am going to risk the flack I might receive because I love ya’ll and, frankly, I care so much about your Thanksgiving happiness!  Because of this…I’m going to talk about…(du du duhhhh)…STUFFING!  Or FILLING!  Or DRESSING!  Whatever you might call it, we’re gonna make it!  Now, not only is the name of the dish hotly contested, but there’s also the eternal…to stuff the bird or not to stuff the bird…question.  I, personally, do not stuff the bird with my stuffing.  I think it results in a stuffing full of the delicious turkey flavor (yay!) but a dry turkey (boo!).  Plus, by the time the stuffing is up to safe eating temperature, the bird has been overcooked.  So, instead, I stuff my turkey with onions, celery, lemons, garlic and herbs and make my stuffing on the side.

So here it goes…my favorite…Pear and Sausage Stuffing!

Ingredients

1 Pound bulk pork sausage
2 Cups diced onion
2 Cups diced celery
4 Tablespoons butter
2 Tablespoons fresh, chopped sage
2 Tablespoons fresh, chopped rosemary
2 Tablespoons fresh, chopped thyme
6 Cups crumbled cornbread
6 Cups (6 cups when dry, about 8 – 10 cups before dry) cubed bread
2 Cups chicken stock
2 Peeled, chopped pears
4 Tablespoons fresh, chopped parsley
2 Tablespoons poultry seasoning
2 Teaspoons salt
1 Teaspoon black pepper

Prep Step


The day before I make the stuffing, I make a batch of cornbread and then crumble it and cube my bread.  This way I have nice, dry FRESH bread for my stuffing.

Step 1


This is THE most important step, so read carefully.  This recipe involves a lot of chopping, so the first thing you need to do is set up your chopping station, complete with a glass of your favorite wine.  Trust me, the wine will make it all possible.  That, and the promise of delicious stuffing! J

Step 2


If you didn’t follow my first step, don’t tell me.  It will just make me sad.  But, we will continue anyway because you need to get that stuffing done!  If you are baking the stuffing right after you make it, turn your oven to 350 degrees; I usually need to wait to put my stuffing in until after my turkey is finished, so I usually end up letting my stuffing sit for an hour or two before baking it.  But in the end, you will want an oven at 350.  Then go ahead and over medium heat, sauté your sausage until it is nice and browned.  Then pour it into a large bowl.

Step 3


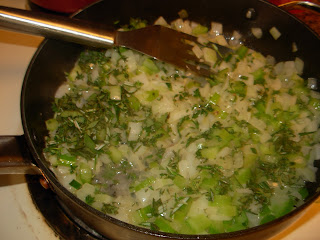
Dice your onion and celery.  Then using the same sauté pan as before, melt the butter over medium heat and add the onion and celery.  While they sauté, chop your thyme, sage and rosemary. 


Then add them to the vegetable mixture and sauté the veggies until they are softened.  Add them to your bowl with the sausage.

Step 4


Peel and chop your pears and chop your parsley.  Add the pear, parsley, poultry seasoning, salt and pepper to your bowl and mix them all together. 


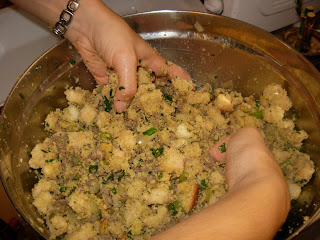
Then add your dried breads along with about 1 ½ cups of stock.  Mix the ingredients, by hand, together.  Add more stock until it is your desired level of wet/dry.  I like the bread cubes to be moist outside but still a little firm so that it will brown nicely on top when it’s baked. 


When you like the way it is, pour it into a casserole dish and bake it for 30 – 40 minutes, or until it is hot and the top has become golden brown.


Happy Thanksgiving!!!

Sunday, October 30, 2011

The Noblest of Fruits

Apple Butter


Henry David Thoreau wrote “Surely the apple is the noblest of fruits.”  Who am I to argue with Thoreau?  I have tasted nothing that would contradict this brilliant American naturalist, philosopher and author's view, so I will instead concentrate on preserving this noble fruit.  Early American colonists preserved this pomaceous fruit by making apple butter.  My first experience tasting apple butter was at the Liberty Tree Tavern in Disney World when I was about nine years old – and I still remember it.  It was positively delicious with its sweet, deep flavor combined with aromatic spices.  It was noble apple heaven spread on a piece of bread.  In more recent years, I have tried my hand at apple butter using a couple of difference methods.  It can be made in a crock pot over a 12 – 24 hour period or roasted in the oven for 3 – 6 hours.  This autumn, my mom and I decided to use the stove method to make some for ourselves.  We canned it using the basic canning methods printed on the box of jars, but it can also be frozen (I have done this in the past quite successfully).

To preserve this noble fruit, you will need:

Ingredients
4 – 5 Pounds of apples (a mix of apple varieties makes for a more interesting flavor)
½ Teaspoon allspice
¼ Teaspoon cloves
¼ Teaspoon nutmeg
1 ½ Teaspoons cinnamon
3-4 Cups of sugar (depending on the sweetness of the apples and your preference)
Pinch of salt
2 Cups of apple cider

Step 1


You begin to make apple butter by making applesauce.  Wash the apples and then slice them into quarters (or sixths if your apples are larger).  Place the quarters in a large pot and add the apple cider. 


Simmer the apples on medium-low heat for about 7 – 10 minutes, or until the apples are very soft.  Make sure you stir the apples occasionally so they do not burn on the bottom!

Step 2


When the apples are soft, use a food mill or other applesauce apparatus to turn the apples into sauce. 


My mom had borrowed this nifty gadget that separated the peels and seeds from the pulp.  It made the job so fast!  If you don’t have an applesauce gadget, you can use a potato masher to break up the apples and then push the pulp through a colander. 


You want to include the apple cider in the apple pulp.

Step 3


Add the allspice, cloves, nutmeg, cinnamon, sugar and salt to the apple pulp after returning it to a large pot.  Now you’re in it for the long haul because you will need to simmer the mixture, stirring every few minutes to prevent burning, for 1 ½ - 2 hours, or until it is brown and thick. 

Sorry for the yellow lighting; I forgot a picture of this step and had to do in in terrible lighting conditions!

When you put a spoonful on a plate, it should stay together, with no liquid oozing from it.  When it reaches this point, you have successfully created apple butter!  (Yes, it is a long process, but it is oh so worth it!)

Step 4


If you are canning, you should get your jars, lids and rings ready while the apple butter finishes.  Then add the hot apple butter to the jars, secure the lids with the rings, and wait for them to give you the “pop” that signals success! J  If you are freezing, freezer bags work really well.  You will want to cool the apple butter before bagging it though.

Enjoy your apple butter on toast, biscuits or mixed into pumpkin pie!  I am planning to experiment with pear butter next year, so stay tuned!

Tuesday, October 25, 2011

Unexpected Guests?!

Pumpkin Gingersnap Sundae

We are rapidly approaching the holiday season!  I’ve been running around telling everyone because I absolutely love this time of year!  It will begin for me at the start of November and continue through til the New Year.  I must admit though, my absolute favorite part of the whole two months is Thanksgiving.  Obviously, I love cooking and love eating…so it makes sense.  But you may not quite understand how much I love the food aspect of this wonderful holiday.  I have been searching the internet for weeks already for the perfect recipes.  This past weekend, I made a pre-pre-Thanksgiving turkey to test out a recipe (yes, the pre-pre means it was a practice for the practice turkey).  I am just that weird.  And just that into food.  But for me, there is no better holiday than one that revolves around a beautiful meal shared with family.  It makes me feel sort of squishy inside thinking about family and how much I have to be thankful for while sharing a lovely meal with them.

Anyway, I am rambling (this is what happens when I think about Thanksgiving!).  I really wanted to share a dessert with you.  With the holiday season comes lots of guests – some expected and some unexpected.  This is the perfect treat to share with all of your guests because you can assemble it quickly, everything will keep for the month perfectly fine and it is oh so delicious!!!

All you need is:


Yes, that’s all you need!  Pumpkin ice cream, caramel sauce and ginger snaps.

To assemble the sundae, simply crumble some ginger snaps (two per sundae works for me) over some pumpkin ice cream.  Then top the ice cream with some caramel sauce.  Finish the sundae by placing a whole cookie on top.  It allows the tasters to know what the cookie crumbs are and let’s face it…it just looks pretty.


That’s it!  All you need for a delicious holiday treat!  It can easily be adapted too.  If you want to go the peppermint route closer to Christmas, use some mint chip ice cream with grasshopper cookies and hot fudge!  So many possibilities!!!  Tell me what you think would be most delicious!

Wednesday, October 12, 2011

Pumpkin Ravioli

Before we get to the good stuff, I wanted to let my lovely readers know I have finally figured out how to make commenting easier (whew, sigh, relief evident).  Now you can just type your comment.  Then in the drop down “Comment as” select “Name/URL.”  You can put any form of your name that you would like; the URL is optional, but if you have your own blog, you can put it in the box.  Just click “Continue” when you are finished and then you will be able to click “Post Comment.”  This means you no longer need to be logged into a Google account to post!  Three cheers!  Hip hip hooray!  Hip hip hooray!  Hip hip hooray!

Pumpkin Ravioli in a Sage Butter Sauce

Sorry about the steam!  It fogged my lens!

That’s enough of the boring stuff.  Time for the start of autumn!  I like apples, but for me, the cool, crisp air and the shorter days mean PUMPKIN!  Last year, my mom and I roasted and pureed sugar pie pumpkins and then froze our puree.  I still have some left in my freezer and decided to use it to make some ravioli!  I was craving it last week when it was cool and dreary and decided to concoct a recipe to satisfy my craving.  Many recipes for pumpkin ravioli (and there aren’t many out there on that vast resource we call the Internet) have no ricotta in the filling.  I, however, love some ricotta in my ravioli filling, so I chose to create my own recipe and use ricotta in addition to the pumpkin.  I also used a shortcut by using wonton wrappers for my pasta.  Sometime, I will post a how-to for making pasta, but it was a weeknight, so I did not have the time.  Wontons are a perfect little alternative!  As for the sauce, I decided to go with a Sage Butter sauce…seemed to compliment the pumpkin well.  When I tasted it…I knew it was success…or in autumn terms in this household…we had a touchdown!  I loved it, and I hope you will too!

Ingredients

Ravioli
Wonton wrappers (I bought a 60 square pack, but 2 packs could be used because I had a lot of filling leftover)
15 oz. Ricotta
1 Cup pumpkin, you may want more
¾ Cup parmesan
1 Teaspoon pepper
1 ½ Teaspoons salt
2 Eggs

Sauce
1 ½ Sticks butter
3 Tablespoons fresh sage, chopped
¾ Teaspoon salt

Step 1
Begin the ravioli making process by preparing your filling.  You will need to combine the ricotta, pumpkin, parmesan, pepper and salt. 


At this point, go ahead and taste the filling.  If you want a stronger pumpkin flavor, go ahead and add it.  You can add more salt and pepper if you like as well.  Just adjust to your own taste.  When you are happy with the flavor, add 1 of the eggs and stir it into the filling.


Step 2


We now need to fill our little pillows of pumpkin pasta (how’s that for alliteration?)!  Mix the remaining egg with a little water to make an egg wash.  Then lay a couple of wonton wrappers down and spoon ¾ - 1 teaspoon of filling into the center of each wrapper.  Make sure you don’t overfill, or the pasta will not seal properly.  Now brush some egg wash around the edges of the wrapper and lay another wonton on top.  Use your fingers to press lightly starting from the area directly around the filling and working your way out.  The goal here is first to remove the air pockets and then to seal the edges.  Set finished ravioli to the side (separate layers with plastic wrap) and continue the process until you are finished.


Step 3


To cook the ravioli, you will need to boil some water in a large pot.  You will only be able to cook 4 – 5 raviolis at a time, so I put the oven on warm at this point too.   When the water is boiling, add the ravioli and cook the batch for 3 minutes.  Then remove them to a baking dish and drizzle a little olive oil on top to prevent sticking.  Put the cooked ravioli in the oven and continue with your next batch…

Step 4


When you are on your last batch of ravioli, it is time for the sauce.  In a skillet, over medium heat, melt your butter.  By this time, your final batch of ravioli is most likely done, so add that to the rest.  You will want to cook the butter for about three minutes, until it just begins to color.  When it colors, add the sage and continue cooking for about 1 minute, until it is golden brown.  Remove the sauce from the heat and stir in the salt.  Pour it over the ravioli and wa la!  You have made homemade pillows of pumpkin perfection!  Enjoy!

Gastronome's Note:  Wonton wrappers are a wonderful vehicle for any variety of ravioli.  Try a wild mushroom filling, which would be delicious with this same sauce!

Sunday, September 25, 2011

Hot Fudge Cupcakes with Peanut Butter Frosting

Are you sitting down?  You will need to be when you see these decadent little beauties…so trust me…please, sit down.  Are you ready?  Drum roll please…

Hot Fudge Cupcakes with Peanut Butter Frosting

Have you ever seen anything that knocked the breath out of you quite this much?  When I first saw the recipe for them on the Pioneer Woman’s Tasty Kitchen site, my pulse and breathing quickened and I KNEW I had to make these.  My two favorite combinations in the universe are chocolate and coffee AND chocolate and peanut butter (there seems to be a chocolate theme…hmmm…I shall need to consult my shrink…or maybe my nutritionist…about this).  When I saw the mound of peanut butter with that oh so enticing drizzle of hot fudge, I thought I had finally attained nirvana.  So I made them.  And I loved them.  And I am tempted to go into the kitchen and make them again.  I shall try to refrain.  My butt will thank me.

I did make them slightly differently than the original recipe, so here is what I did.  You can check out the original at the link above.

Ingredients
Cupcakes
1 Egg
¾ Cup brown sugar
½ Cup milk
½ Cup, plus 1 Tablespoon heavy cream
½ Cup butter, melted
1 Teaspoon vanilla extract
2 Tablespoons sour cream
1 1/8 Cup flour
¼ Cup cocoa powder
1 ¼ Teaspoon baking soda
½ Teaspoon salt
¼ Cup hot fudge (recipe below)

Frosting
½ Cup butter, softened
2/3 Cup peanut butter
3 Cups powdered sugar (you may need more depending on consistency)
1 Tablespoon milk (you will probably need more on hand to make it the right consistency, I did)
1 Teaspoon vanilla extract
1 Pinch salt

Hot Fudge
1 Cup sugar
1 Cup cocoa powder
1 Pinch salt
2 Tablespoons flour
1 Cup hot milk
1 Tablespoon butter
1 Teaspoon vanilla extract

Step 1
The first thing you will need to do is make the hot fudge.  The original is written using a double boiler, so that is how I started.  But I stirred and stirred for a very long time and it did not thicken, so I ended up over direct, but low, heat.  You may have better luck with the double boiler than I did, so feel free to try that first if you would like.  This is just to warn you, you may need to switch over to a pot over low heat if it’s not thickening.


Combine the sugar, cocoa, salt and flour in a bowl over the double boiler (or in a pot over low heat).  Heat the milk in a saucepan until it is scalding or you can microwave it until it is hot.  Gradually add the milk to the chocolate mixture and stir constantly until the mixture thickens.  It will probably take about 5 minutes, or 15 if you are like me…but it should have taken closer to five.  When it is your desired thickness, remove it from the heat and stir in the butter and vanilla.  Then let it begin cooling while you start the cupcakes.

Step 2
Preheat the oven to 350 degrees.  Line a muffin tin (one recipe will make 12 cupcakes) with cupcake papers.

Step 3
Now it is truly cupcake time…step 2 was just to fake you out.  Combine the egg and brown sugar until they are smooth. 


Add the milk, cream, melted butter and vanilla and mix until they are combined. 


Stir in the sour cream.  Now add all the dry ingredients and mix until they have just combined.  An overmixed batter will result in a tough cupcake…and no one likes a tough cupcake. J  Add the hot fudge and stir it into the batter by hand.


Step 4
Fill the cupcake liners with ¼ cup of batter (as you can see, I am not adverse to using my fingers, but I would imagine a spoon is much more acceptable) and bake them for 15 – 18 minutes.  Let them cool and it’s time to make the frosting.


Step 5
Cream the peanut butter and butter together until they are fluffy…about 3 – 5 minutes.  Add the powdered sugar and then gradually add the milk and vanilla extract.  Add the pinch of salt and beat until it is fluffy.  If the frosting is too thick, add more milk; if the frosting is too thin, add some more powdered sugar.

Step 6
I decided to stuff the cupcakes with hot fudge instead of frosting…the thought of biting into chewy chocolate was just too tempting!  So I filled my pastry decorating apparatus with fudge and inserted the tip into the cupcake and just added a little fudge to the center. 


Then I frosted the cupcakes with the peanut butter frosting...


 and finished by drizzling the hot fudge on top.


I know there are a lot of steps to these cupcakes, but they really were not that difficult and the results were oh so delicious!  Hmm...I may need to get the oven preheating ...just in case...