Showing posts with label Thanksgiving. Show all posts

Monday, November 5, 2012

Best Cranberry Sauce Ever!

Best Cranberry Sauce Ever


It is this gastronome's favorite time of year!  The weather is cool, November is here and Turkey Day is rapidly approaching!  What could be better than a holiday that centers around sitting down with family and friends to enjoy a labor of love together?  I can't think of anything I would rather do. 

In fact, I love this beautiful holiday so much that I begin looking for recipes and ideas as soon as September begins.  I love to incorporate one or two new dishes into each Thanksgiving, while keeping the favorite stand-bys. This is one of my favorite dishes and I have made it year after year.  I started using this Paula Deen recipe years ago and have changed it a little each year.  I tweaked it even more this year in preparation for my favorite day and was so happy with the results.  

I actually used to hate cranberry sauce.  Or should I say "cranberry sauce."  You know what I am talking about.  The stuff that comes out of a can still looking like a can - ridges and all. Seriously.  You can see the ridges.  The first time I made this dish, I remember wondering why I ever thought cranberry sauce could only come in that hideous form.  I went from a cranberry sauce hater to a cranberry sauce lover.  Give this a try this year.  When you taste the tart berries, mixed with the sweet apple and sugar, the tang and brightness of citrus and the crunch of the walnuts, I know you won't be disappointed.

Ingredients
1 Cup sugar
1 Cup water
1 12 Ounce bag fresh cranberries
1 Apple, peeled and chopped
1 Cup chopped walnuts
1/4 Cup Grand Marnier
2 Tablespoons apple brandy
Zest of 1 orange
Juice of 1/2 an orange
Juice of 1/2 a lemon
1 Teaspoon cinnamon
1/2 Teaspoon nutmeg


Step 1
Begin by prepping (of course, you know me! Prep then cook!:-)) your ingredients.  Peel and chop the apple, chop your walnuts if you bought them whole or halved, zest the orange and juice the half orange and lemon.


Step 2
The prep for this dish was easy, wasn't it?  The cranberry sauce only gets easier too...unbelievable, right?! 


Combine the water and sugar over medium-high heat and stir them until it begins to boil. 
 

Then add the cranberries and return it to a boil.

Step 3

 
When the cranberries begin to boil, add the rest of the ingredients and reduce the heat to a simmer. 
 
 
Stir the mixture occassionally and allow to to simmer for 10 - 15 minutes.  The cranberries will burst and combine with the apple pectin to create a ruby red, thick sauce. 


Let it cool completely and the store it in the refrigerator. 


Another beautiful thing about this sauce is you can keep it in the fridge for a few days, so it is definitely not one of those last minute, stressful dishes!

Monday, November 21, 2011

Cauliflower Gratin

Cauliflower Gratin


Thanksgiving is almost here!  You probably already have your menu planned, but if you’re like me…one particular side dish is an after thought.  The turkey, the stuffing, the potatoes…they are all center-stage.  Then, there’s the vegetable.  You have to have it.  What kind of nutritious meal would it be without at least one vegetable on the table?!  But, you don’t really care what it is or how it is prepared.  This Cauliflower Gratin revolutionizes my Thanksgiving table.  Instead of seconds of the stuffing and potatoes, I’m reaching for more of this cheesy cauliflower dish.  What makes it so special?  Gruyere.  Period.  That is what makes this vegetable dish a rock star at the table.  The nuttiness of this cheese puts this dish over the top.  Give it a try and I think you will agree.  The recipe is basically followed from Ina Garten’s, but I did give it a few tweaks.  So here is my rendition…and maybe you will agree that the veggie will win best of show at the table this year!

Ingredients
2 (3 lbs. each) heads of cauliflower
Kosher salt
8 Tablespoons butter
6 Tablespoons flour
4 Cups hot milk (I used 2%)
1 Teaspoon pepper
¼ Teaspoon nutmeg
1 ½ Cups Gruyere, grated
1 Cup Parmesan (freshly grated is best)
½ Cup panko bread crumbs

Step 1
Preheat the oven to 375 degrees.  Using a stock pot, put hot water on the bottom and put it on the burner over medium-high heat.  Then prepare the cauliflower by cutting it into large florets.  When the water in the stock pot is boiling, put half of the cauliflower into the steam basket.  Cover and steam the cauliflower for 6 minutes.  Put the cauliflower in a bowl and steam the rest for another 6 minutes.

Step 2
Grate your Gruyere and parmesan, so they will be ready when your sauce is finished.  Also, place the milk in the microwave and let it heat for a couple of minutes, until it is hot.

Step 3
Next, melt 4 tablespoons of butter in a large saucepan over medium low heat.  When it has melted, add the flour and whisk constantly, cooking the roux for about 2 minutes.  Pour the hot milk into the roux and whisk it to combine into a smooth mixture.  Bring the sauce to a boil, for about 1 minute, until it thickens.  Then remove it from the heat and add 2 teaspoons of salt, the pepper, nutmeg, 1 cup of the Gruyere and the parmesan.  Mix it just to melt the cheese and combine the sauce.  At this point, I taste it to make sure it is the way I want it.

Step 4
Pour 1/3 of the sauce on the bottom of a casserole dish.  Place the cauliflower on top of the sauce and then pour the rest of the sauce evenly over top.  Note:  At this point, you can put the dish aside and finish right before you are ready to bake it.  It makes a great do ahead veggie!!!  When you are ready to bake it, combine the bread crumbs with the rest of the Gruyere and sprinkle them evenly over the top.  Melt the remaining 4 tablespoons of butter and drizzle it over the the bread crumbs.  Bake the gratin for 30 -40 minutes, or until the top is golden brown.

Gastronome's Note:  The cauliflower will still be a little firm, which is how I like it.  You can obviously steam it longer in the beginning if you prefer more mushy...errr...well done.

Saturday, November 12, 2011

To Stuff or Not to Stuff...that is the Question

Pear and Sausage Stuffing


I am, against my better judgment, going to highlight the Thanksgiving dish that is the center of eternal debates.  I am going to risk the flack I might receive because I love ya’ll and, frankly, I care so much about your Thanksgiving happiness!  Because of this…I’m going to talk about…(du du duhhhh)…STUFFING!  Or FILLING!  Or DRESSING!  Whatever you might call it, we’re gonna make it!  Now, not only is the name of the dish hotly contested, but there’s also the eternal…to stuff the bird or not to stuff the bird…question.  I, personally, do not stuff the bird with my stuffing.  I think it results in a stuffing full of the delicious turkey flavor (yay!) but a dry turkey (boo!).  Plus, by the time the stuffing is up to safe eating temperature, the bird has been overcooked.  So, instead, I stuff my turkey with onions, celery, lemons, garlic and herbs and make my stuffing on the side.

So here it goes…my favorite…Pear and Sausage Stuffing!

Ingredients

1 Pound bulk pork sausage
2 Cups diced onion
2 Cups diced celery
4 Tablespoons butter
2 Tablespoons fresh, chopped sage
2 Tablespoons fresh, chopped rosemary
2 Tablespoons fresh, chopped thyme
6 Cups crumbled cornbread
6 Cups (6 cups when dry, about 8 – 10 cups before dry) cubed bread
2 Cups chicken stock
2 Peeled, chopped pears
4 Tablespoons fresh, chopped parsley
2 Tablespoons poultry seasoning
2 Teaspoons salt
1 Teaspoon black pepper

Prep Step


The day before I make the stuffing, I make a batch of cornbread and then crumble it and cube my bread.  This way I have nice, dry FRESH bread for my stuffing.

Step 1


This is THE most important step, so read carefully.  This recipe involves a lot of chopping, so the first thing you need to do is set up your chopping station, complete with a glass of your favorite wine.  Trust me, the wine will make it all possible.  That, and the promise of delicious stuffing! J

Step 2


If you didn’t follow my first step, don’t tell me.  It will just make me sad.  But, we will continue anyway because you need to get that stuffing done!  If you are baking the stuffing right after you make it, turn your oven to 350 degrees; I usually need to wait to put my stuffing in until after my turkey is finished, so I usually end up letting my stuffing sit for an hour or two before baking it.  But in the end, you will want an oven at 350.  Then go ahead and over medium heat, sauté your sausage until it is nice and browned.  Then pour it into a large bowl.

Step 3


Dice your onion and celery.  Then using the same sauté pan as before, melt the butter over medium heat and add the onion and celery.  While they sauté, chop your thyme, sage and rosemary. 


Then add them to the vegetable mixture and sauté the veggies until they are softened.  Add them to your bowl with the sausage.

Step 4


Peel and chop your pears and chop your parsley.  Add the pear, parsley, poultry seasoning, salt and pepper to your bowl and mix them all together. 


Then add your dried breads along with about 1 ½ cups of stock.  Mix the ingredients, by hand, together.  Add more stock until it is your desired level of wet/dry.  I like the bread cubes to be moist outside but still a little firm so that it will brown nicely on top when it’s baked. 


When you like the way it is, pour it into a casserole dish and bake it for 30 – 40 minutes, or until it is hot and the top has become golden brown.


Happy Thanksgiving!!!

Tuesday, October 25, 2011

Unexpected Guests?!

Pumpkin Gingersnap Sundae

We are rapidly approaching the holiday season!  I’ve been running around telling everyone because I absolutely love this time of year!  It will begin for me at the start of November and continue through til the New Year.  I must admit though, my absolute favorite part of the whole two months is Thanksgiving.  Obviously, I love cooking and love eating…so it makes sense.  But you may not quite understand how much I love the food aspect of this wonderful holiday.  I have been searching the internet for weeks already for the perfect recipes.  This past weekend, I made a pre-pre-Thanksgiving turkey to test out a recipe (yes, the pre-pre means it was a practice for the practice turkey).  I am just that weird.  And just that into food.  But for me, there is no better holiday than one that revolves around a beautiful meal shared with family.  It makes me feel sort of squishy inside thinking about family and how much I have to be thankful for while sharing a lovely meal with them.

Anyway, I am rambling (this is what happens when I think about Thanksgiving!).  I really wanted to share a dessert with you.  With the holiday season comes lots of guests – some expected and some unexpected.  This is the perfect treat to share with all of your guests because you can assemble it quickly, everything will keep for the month perfectly fine and it is oh so delicious!!!

All you need is:


Yes, that’s all you need!  Pumpkin ice cream, caramel sauce and ginger snaps.

To assemble the sundae, simply crumble some ginger snaps (two per sundae works for me) over some pumpkin ice cream.  Then top the ice cream with some caramel sauce.  Finish the sundae by placing a whole cookie on top.  It allows the tasters to know what the cookie crumbs are and let’s face it…it just looks pretty.


That’s it!  All you need for a delicious holiday treat!  It can easily be adapted too.  If you want to go the peppermint route closer to Christmas, use some mint chip ice cream with grasshopper cookies and hot fudge!  So many possibilities!!!  Tell me what you think would be most delicious!

Monday, April 25, 2011

Confused Tom

Roasted Turkey Breast


Poor Tom Turkey was confused this past weekend.  With all the cold weather lately, who can really blame him?  But the poor bird arrived in our home this holiday weekend instead of Miss Piggy.  We didn’t want to embarrass the befuddled bird, so we smiled, thanked him for coming and made him instead.  Well…his breast really.  I’m sure the rest of him went to great use.  Ever have a smoked turkey leg?  We did at Christmas Candylane one year…YUM!  Yes, I’m sure the legs went to a great cause such as that!  But we only had the breast, so we roasted it and were wowed with the results!  What a happy outcome to the poor fowl’s confusion!  Here is what we did:

Ingredients:
5 ½ Pound turkey breast (if yours is larger, just increase the butter mixture a little)
3 Tablespoons butter, softened (I use unsalted)
7 – 10 Sprigs fresh thyme
2 Cloves garlic, minced
4 Tablespoons Dijon, divided
2 Tablespoons lemon juice, divided
1 Onion, quartered
3 Ribs celery, cut into large sticks
1 ½ Cups chicken stock
Salt and Pepper

Step 1
The first step is super easy - preheat the oven to 325 degrees.  See?  How easy was that?  It will get a little more involved now…but will still be easy!

Step 2


We need to prepare the butter mixture that will be spread under the skin.  Begin by putting the softened butter into a bowl.  Remove the thyme leaves from the stems and add them to the bowl.  Mince the garlic and add that too.  Finally, add 2 tablespoons of Dijon, 1 Tablespoon of lemon juice and a nice amount of salt and pepper.  Mix to combine.

Step 3


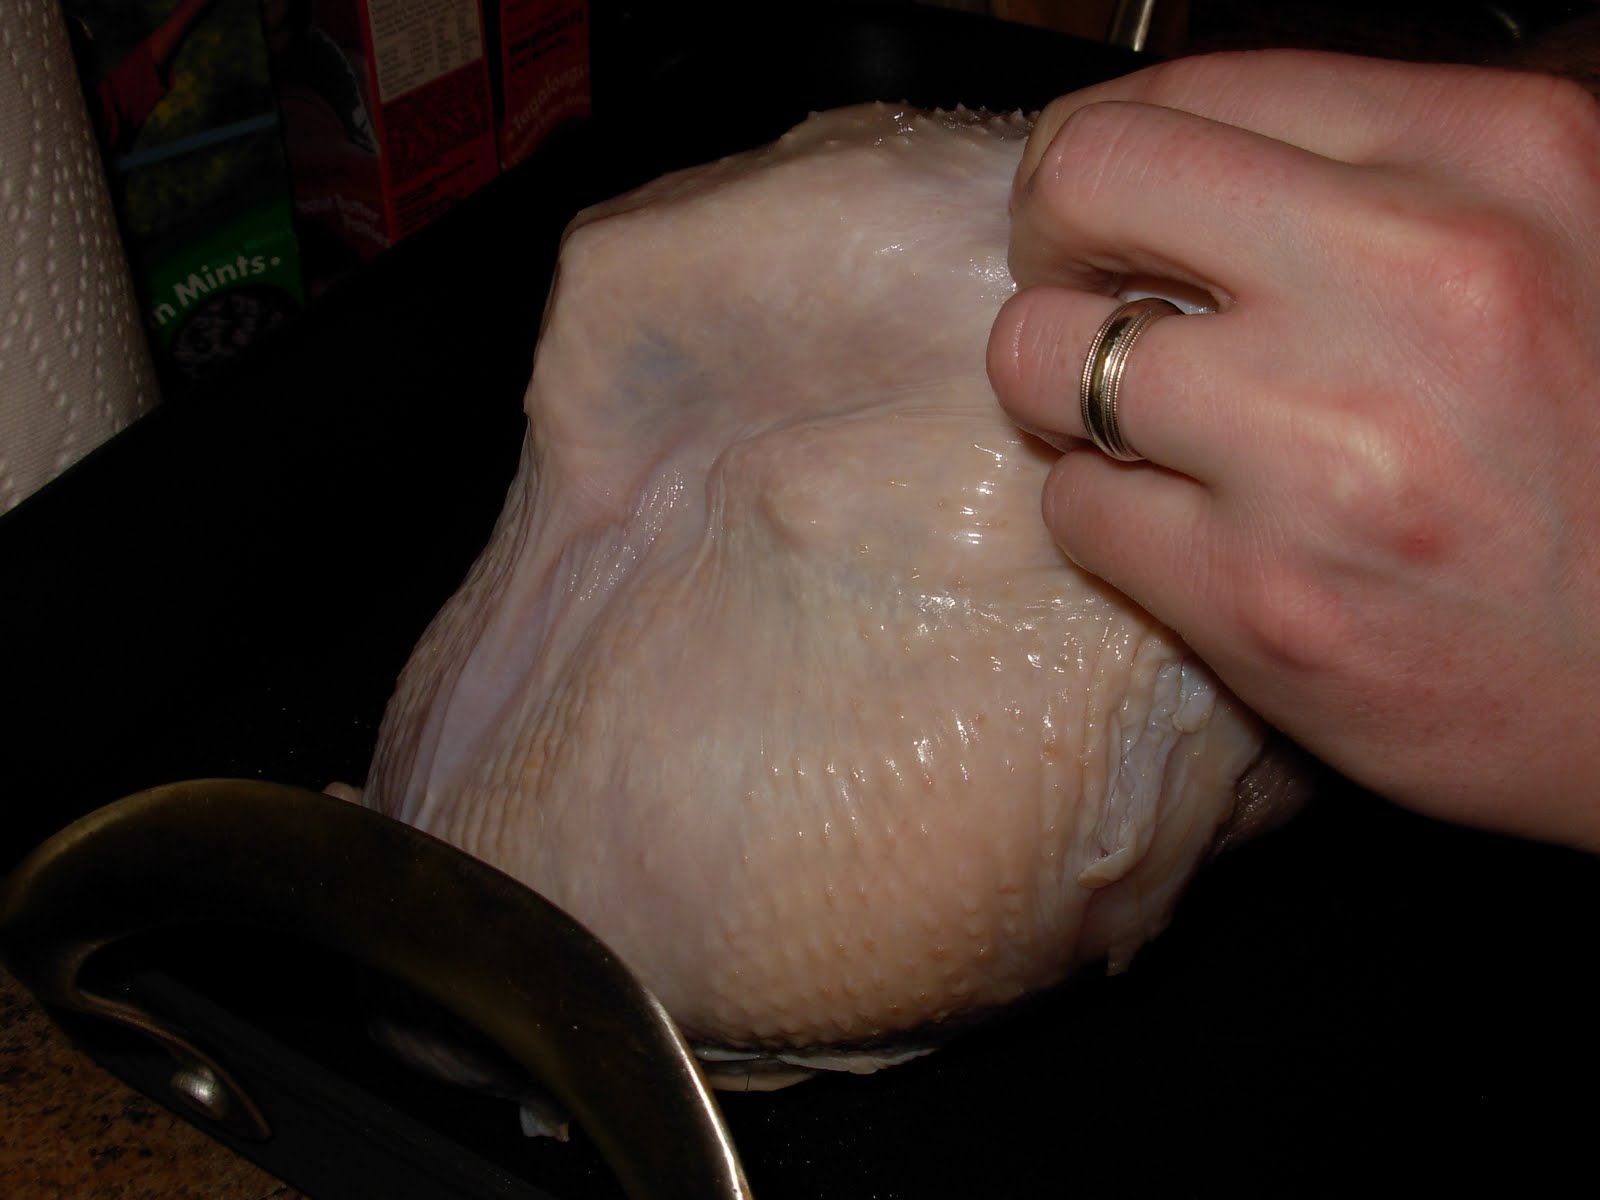
Now the skin of the breast needs to be separated from the flesh.  This is where my husband comes in because I have freakishly large hands!  He just works his hands between the skin and the flesh until there is a nice, large cavity over the breast meat.  Then spread the butter mixture on the breast meat, but under that skin.  This ensures flavorful meat!  If you just spread the mixture on top of the skin, the skin will taste delicious, but the meat will not be seasoned or flavored.


Step 4


Quarter the onion and chop the celery into large sticks.  Place the turkey into a roasting pan, breast meat up.  I used the onion quarters and celery to help keep it securely upright.  Then pour the broth, remaining Dijon (2 Tbsp.) and lemon juice (1 Tbsp.) into the pan, around the turkey.  Whisk them to combine, briefly.  Add a nice sprinkling of salt and pepper to the top of the skin.  Then place the bird in the oven.

Step 5
We roasted it for 1 ¼ hours.  Then, I turned the heat up to 350 degrees for 15 minutes, just get the skin a little more browned.  Make sure you check the meat temperature before you removed it from the oven.  I look for 160 degrees because it will get to the desired 165 while it’s resting, covered in foil, for 15 minutes.  I find if I roast it to 165 and then remove it, the turkey is dry.

Step 6


After the turkey has roasted, it’s time to carve!  Make the horizontal and vertical cuts on each side of the breast bone, to remove both breasts from the bird.  Then slice it against the grain.  I don’t know why, but it stays more juicy and tender when sliced against, instead of with, the grain.  Serve the turkey with some of the pan juices spooned on top of the meat.

Enjoy!

Gastronome's Note:  I have a nonstick roasting pan, so it cleaned easily.  If yours is not nonstick, you may want to line the roasting pan with aluminum foil for easier clean up.