Tuesday, May 31, 2011

Coconut Curry Bliss

Coconut Curry Mussels

Mussels are one of my favorite things to eat in the summer.  One bite and I am transported to some fabulous vacation spot sipping wine, picking mussels from their shells, not a care in the world.  They are delicious cooked in any sauce that involves wine and butter.  Of course, that means I always need crusty bread with my mussels because wine and butter should NEVER go to waste. 

One of my favorite mussel sauces is a coconut curry sauce.  I fell in love with this style at one of my favorite restaurants in Buffalo, NY – the Empire Grill.  They have fantastic food in a chic, urban style restaurant.  It actually opened while we were living in Buffalo and was only two minutes from our apartment, so we frequented the restaurant and became rather familiar with their menu.  Their coconut curry mussels were one of my favorite items on their menu (along with the pomegranate martini – they make THE BEST pomegranate martini!).  While missing the Empire Grill this past weekend, we decided to recreate their mussels.  I think we came pretty darn close.  Here’s what we did:

Ingredients
Mussels (we buy them in a 2 lb. mesh bag at the grocery store)
2 Tablespoons olive oil
2 Tablespoons butter
1 Serrano pepper
½ Stalk lemon grass, sliced
½ Cup onion, diced
2 Cloves garlic, minced
2 Tablespoons Thai red curry paste
1 (14 oz.) Can coconut milk (we used Thai Kitchen’s Lite Coconut Milk)
1 Cup white wine
3 Tablespoons cilantro (leaves and stems), chopped
2 Teaspoons basil, chopped
Salt
Bread, for dipping

Step 1
If you have never prepared mussels before, let me prepare you for what I did not know until I made them my first time.  They are alive.  At least, the edible ones are alive.  Don’t worry, the won’t snap their shell on your finger or anything scary like that (which is what I imagined my first time!).  But you do want to test them to be sure they are living.  So rinse the shells under cold water to clean them, make sure their shells stay firmly shut or stay closed when you shut them, and pull out any “beard” that is sticking out of the shell.  Then put each cleaned mussel in a big bowl of cold water.  Discard any mussels that do not stay closed or any with cracked shells.

Step 2
It’s veggie prep time now!  Using gloves, clean as much of the ribs and seeds from the Serrano as you would like, keeping in mind ribs and seeds = heat.  If you don’t like the heat at all, use a jalapeno instead.  Small dice the Serrano once you clean it.  Thinly slice the lemon grass, dice the onion and mince the garlic.  While you are at it, you should probably just chop the cilantro and basil, but keep these separate.

Step 3
Now it’s time to start cooking!  Melt butter with the oil in a large lidded pot over medium high heat.  We obviously do not want the lid on right now, but it will be necessary later, so make sure the pot has a lid.  When the butter has melted and the oil has heated, add the Serrano, lemon grass and onion.  Sauté the veggies until they begin to soften (approximately 3 minutes) and then add the garlic.  Let this cook for another minute and then add the Thai red curry paste.  Stir the veggies until the curry paste completely coats them.  Now add the coconut milk and wine.  Mix the sauce together and then taste it.  I thought it needed some salt at this point, so I added it.  If you don’t need salt, then yay for you and your blood pressure! J  Cover the pot and bring it to a boil.

Step 4


When the liquid boils, turn the heat back to medium low and add the mussels (minus the water the mussels have been swimming in).  Stir the mussels to coat them in the sauce and then cover the pot and let the mussels simmer/steam.  They should open in 4 – 6 minutes.  When the mussels have opened, pour them – sauce and all – into a serving bowl.  Sprinkle the fresh herbs over the mussels.  Serve them with the bread and enjoy!

Gastronome's Note:  Please, please do not eat any mussels that stay closed after steaming!  They can make you sick!

Wednesday, May 25, 2011

Birthday Sweets and Treats

Double Chocolate Macadamia Nut Cookies

I love birthdays.  Period.  I love planning, months ahead of time, what I am going to give to someone for their birthday.  I love begging people to tell me where they will choose to spend their birthday dinner even though most of the time they have not even thought about it yet.  I also love the sweets that are involved in a birthday celebration!  It is so fun to see what sweet treat a person selects to share (or eat on their own – I don’t judge!) in honor of their special day.  My husband, on the other hand, is not so into birthdays.  I begged and pleaded with him to tell me where he might like to dine for his birthday (granted, I did start about two months prior to his birthday…but what can I say?  I’m enthusiastic! J).  I pestered him over and over to tell me what sweet treat he might like to take to work to share for his birthday.  He would tell me that he didn’t care; I could make whatever I wanted.  So I did.  I made Ghirardelli’s Macadamia White Chip Cookies, but altered them slightly with a couple changes.  The most significant is that I turned them into Double Chocolate Macadamia Nut Cookies.

Before the recipe though, I want to show you a gift my husband received from a colleague.  I had seen them on various food shows and was so excited to see one in person!  It really does taste like a fortune cookie too!  It was from Cookie HQ.  Check out their website to see all the large fortune cookie varieties! 


(Disclaimer:  I am in no way affiliated with Cookie HQ.  No one at the company even knows that I exist.)


Ingredients
1 Cup butter, softened
1 ½ Cups granulated sugar
1 Cup brown sugar
2 Eggs
1 ½ Teaspoons vanilla extract
3 Cups flour
½ Teaspoon baking soda
1 Teaspoon salt
2 Cups (1 bag) white chips
1 Cup bittersweet or semisweet chocolate chips
1 ½ Cups Macadamia nuts, chopped (I used half salted and half unsalted)

Preheat the oven to 350 degrees.

Cream the butter and sugars until fluffy (approximately 3 minutes).  Then add the vanilla and the eggs, one at a time.  Beat the mixture well so that everything is completely combined before we add the flour.  When it’s mixed thoroughly, add the flour, baking soda and salt and mix until it is just combined.  Then stir in both types of chips and the macadamia nuts.  Drop the cookie dough by the teaspoon full onto ungreased cookie sheets (I lined them with parchment paper because it makes cookie removal MUCH easier!).  Bake the cookies for 10 – 12 minutes.  When I removed the tray from the oven, I kept the cookies on the sheet for three minutes because once they were slightly cooled and set, they were much easier to keep intact when removed from the sheet.  Cool them on a wire rack…but do be sure to enjoy at LEAST one while warm…ooey gooey chocolate chips are just the best!


Enjoy!

Gastronome's Note:  Next time I make these, I think I am going to try toasting the Macadamia Nuts to get even more flavor.  Try it and tell me what you think!

Wednesday, May 11, 2011

Girl Scout Inspired

Samoas Style Cookie Bars


This past winter, I learned just how much I was missing growing up in a coconut adverse family.  This is because this past winter, I realized there are more Girl Scout cookies than Thin Mints and Tagalongs.  I was introduced to a cookie with a perfect little shortbread crust, bathed with luxurious caramel, encrusted with toasted coconut and encased in decadent chocolate – I was introduced to the Samoas.  I was hooked at first bite.  We tried to ration that box full of the perfect cookie, but alas, before long, the midnight dips into the cookies came to an end when my expectant hand came up empty.  At that moment, I knew I had to recreate this cookie.  I chose to change it a little, adding my own spin and twists on it.  This is what I did.  I hope you enjoy.  As for me, they will carry me through the year until a little girl in a green uniform knocks on my door next year.  I hope I don’t scare her when I shriek with glee…

Ingredients
Shortbread Cookie Crust
1 ¼ Pound butter, unsalted
¾ Cup sugar
3 Extra large eggs
¾ Teaspoon vanilla
4 ½ Cups flour
½ Teaspoon baking powder
¼ Teaspoon salt

Caramel
4 Tablespoons butter, unsalted
3 Cups sugar
5 Tablespoons light corn syrup
1 Cup heavy cream

3 – 4 Cups shredded coconut
11 ½ Ounces chocolate chips (I used bittersweet)
Sea salt

Step 1


The first step in making these cookie bars is to prepare the crust.  Preheat the oven to 350 degrees.  Cream the butter and sugar together; it will take about three minutes for them to combine perfectly.  Then add the eggs and vanilla and mix until they are completely combined.  Finally, add the dry ingredients and mix only until they are just combined.  We don’t want to overwork that flour!  Then spread the dough into an ungreased sheet pan and bake for 30 minutes, or until it is just starting to brown around the edges.  Remove the cookie crust and let it begin to cool while we move on to step 2!


Step 2
Next, we want to toast the coconut.  With the oven still at 350 degrees, spread the coconut on a sheet pan and put it in the oven.  Stir the coconut every 2 – 3 minutes, until it is a toasty golden brown.  It will take anywhere from 7 – 15 minutes, depending on how moist your shredded coconut is.  When it is toasted, let it sit while you move on to step 3.

Step 3


This is the most tricky portion of the recipe, but it is not nearly as scary as most caramel recipes…so just bear with me and we will get through it!  You will want to use a rather large pot for this because it will boil up later on and we don’t want it to cook out of the pot and onto the stove – what a mess that would be!  I used a medium sized soup pot that has a nice, thick bottom (that way my sugar would not burn).  Turn the heat on to medium to medium high and add the sugar and corn syrup to the pot.  Now, this is not the time to answer the door or start a load of laundry…this requires your complete attention.  You will need to stir the mixture (I used a wooden spoon with a nice long handle due to a later part of this process) about every 30 seconds to 1 minute.  It usually takes me about 5 – 10 minutes, but cook and stir the mixture until the sugar has completely melted and it has become an amber color.  Now, please be careful at this point!  You will need to reduce the heat to low and add the cream and butter.  BUT BE CAREFUL!  It will bubble up and you will need to stir.  For me, this means a potholder and my longest handled wooden spoon and stirring until the steam is too much and then taking a break.  Do not burn yourself!!!!  Just cool your hand a moment and stir again.  When the mixture has been combined to a smooth caramel, pour it over the cookie crust.  Use your spoon to make sure it is spread evenly.

Step 4


Sprinkle the toasted coconut over the caramel and press slightly (without touching the hot caramel, of course!).

Step 5


While that begins to cool, use a double boiler or homemade double boiler (pot with water covered with a bowl) to melt the chocolate.  Make sure the bowl is not touching the boiling water.  Stir periodically until the chocolate is perfectly smooth.  I then put the chocolate in a squeeze bottle to top the bars.  You could also use a pastry bag with the writing tip.  Another option is just to take a spoon and drizzle it over the top of the bars.  Regardless of how you accomplish it, just get the chocolate on the cookie! J

Step 6
I then sprinkled sea salt over the top of the bars and let them cool to room temperature.  Then I put them in the fridge for an hour to make them easier to cut.  I cut them and stored them in the fridge.  I recommend letting them come up to room temperature before serving because the cookie is much softer and the caramel is not as likely to break a tooth (dentist’s orders! Haha). 


Enjoy!

Tuesday, May 3, 2011

Feliz Cinco de Mayo!

Chipotle Turkey Chili with Chipotle Cornbread


Hola mis amigos!  It’s almost Cinco de Mayo!  In honor of this south of the border holiday, I thought I would share this Chipotle Chili recipe with you.  There’s also a bonus quick and easy recipe for Chipotle Cornbread…just because I thought ya’ll might REALLY want to celebrate. J  I made the chili to use some leftovers from the turkey breast recipe I posted last week and it turned out fantastico!  Seriously, Tim (my husband) and I were blown away by the flavors in this simple and HEALTHY chili!

I find chili to be more of a method than an exact recipe.  So this time around, I’m going to post the directions first and the ingredient list (with my measurements) second.  Finally, I’ll post the directions for the quick and easy Chipotle Cornbread. 

Step 1
Dice some onion and chop some garlic and chipotle peppers in adobo.  At this point, I also cubed my turkey breast.  Feel free to use leftover beef or chicken instead if that’s what you have in your fridge.  If you don’t have any leftover meat sitting around that you want to use, ground turkey, chicken or beef would work just fine!

Step 2
Heat a medium-sized pot over medium high heat.  Add a couple tablespoons of olive oil.  When it’s hot, add your onions.  Cook them until softened (about 3-5 minutes) and then add the garlic and chipotle peppers.  Stir them together and let the mixture cook for another minute.  Then add the meat.  Since my meat was already cooked, I just stirred them together and let them heat while I went to the next step.  If using ground meat, you will want to brown it before proceeding.

Step 3
Drain and rinse a can of kidney beans and add those to the pot.  Then hand crush a can of stewed tomatoes (mine had onions, celery and green peppers in the can as well) and add those to the mixture.  Combine the ingredients.

Step 4
Add chili powder, some of the adobo sauce from the can, chicken (or beef if using beef) stock, oregano and...drumroll please…TEQUILA!  Yes, you read that correctly!  I tasted it after adding the other ingredients and thought it needed some depth.  I had no beer on hand, so I reached for the only Mexican alcohol I had which was tequila.  It made all the difference!  Just try it…I don’t think you will be disappointed!  Finally, add some salt to taste and let the chili simmer, covered, for at least 20 minutes.

Step 5
Serve with sour cream and shredded cheddar cheese on top.

Ingredients
3 Cups turkey, cubed
1 Onion, diced
2 Cloves garlic, chopped
2 Chipotle peppers in adobo sauce, chopped
1 Tablespoon adobo sauce (from the can)
1-14 Ounce can stewed tomatoes
1-14 Ounce can kidney beans
2 Teaspoons chili powder
½ Teaspoon oregano
2 Cups chicken stock
2 Tablespoons tequila
Salt
Sour cream
Shredded cheddar cheese

Gastronome's Note:  Chili can be a rather personal thing.  If you like it to be more of a soup, add more stock.  If you like it thick, add less stock (I know, common sense...just felt I had to say it! :-)).  Add spices to your own taste.  Make it the way you like it!


Chipotle Cornbread

To use leftover chipotle peppers from the chili, I added them to some cornbread.  I just used a Jiffy corn muffin mix and made it to the package specifications.  To the batter, I added 2 chopped chipotle peppers, a handful of frozen corn kernels (for texture) and about a half cup of shredded cheddar cheese.  I then spread it in a square, greased baking dish and bake it according to the package directions!  It was perfect served along side the chili!

Monday, April 25, 2011

Confused Tom

Roasted Turkey Breast


Poor Tom Turkey was confused this past weekend.  With all the cold weather lately, who can really blame him?  But the poor bird arrived in our home this holiday weekend instead of Miss Piggy.  We didn’t want to embarrass the befuddled bird, so we smiled, thanked him for coming and made him instead.  Well…his breast really.  I’m sure the rest of him went to great use.  Ever have a smoked turkey leg?  We did at Christmas Candylane one year…YUM!  Yes, I’m sure the legs went to a great cause such as that!  But we only had the breast, so we roasted it and were wowed with the results!  What a happy outcome to the poor fowl’s confusion!  Here is what we did:

Ingredients:
5 ½ Pound turkey breast (if yours is larger, just increase the butter mixture a little)
3 Tablespoons butter, softened (I use unsalted)
7 – 10 Sprigs fresh thyme
2 Cloves garlic, minced
4 Tablespoons Dijon, divided
2 Tablespoons lemon juice, divided
1 Onion, quartered
3 Ribs celery, cut into large sticks
1 ½ Cups chicken stock
Salt and Pepper

Step 1
The first step is super easy - preheat the oven to 325 degrees.  See?  How easy was that?  It will get a little more involved now…but will still be easy!

Step 2


We need to prepare the butter mixture that will be spread under the skin.  Begin by putting the softened butter into a bowl.  Remove the thyme leaves from the stems and add them to the bowl.  Mince the garlic and add that too.  Finally, add 2 tablespoons of Dijon, 1 Tablespoon of lemon juice and a nice amount of salt and pepper.  Mix to combine.

Step 3


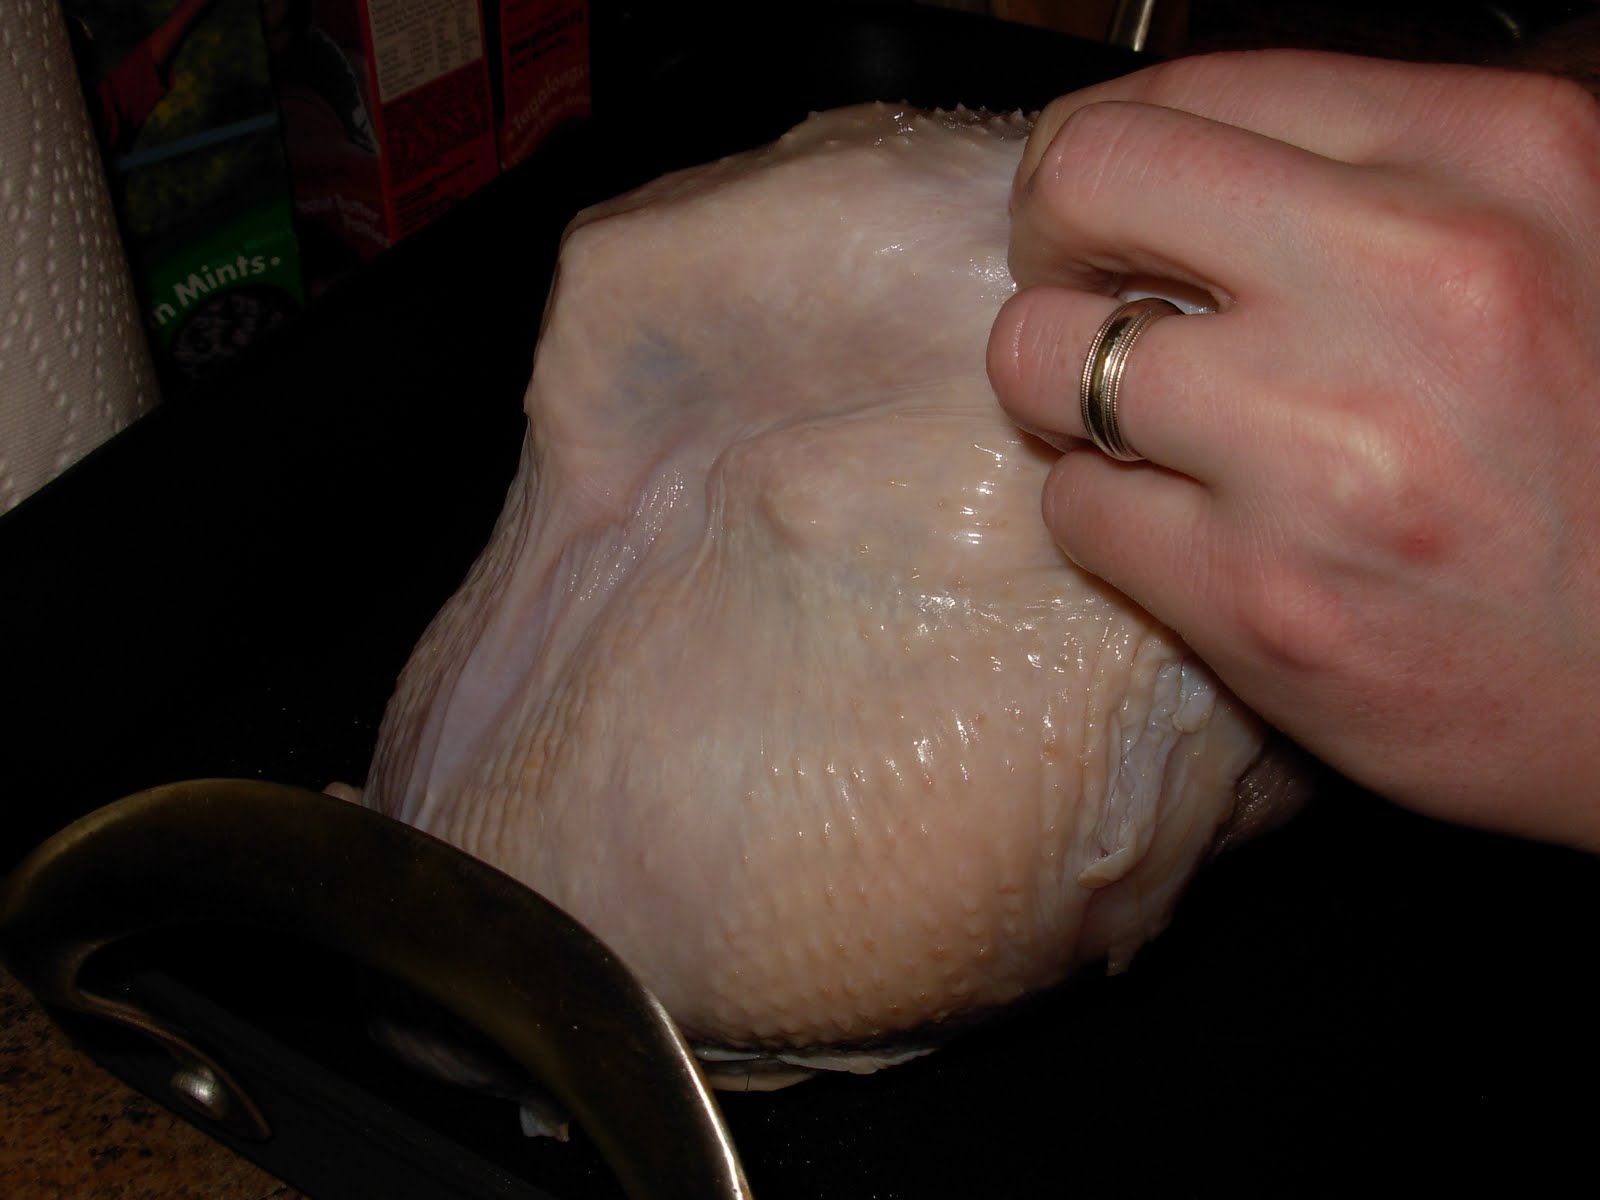
Now the skin of the breast needs to be separated from the flesh.  This is where my husband comes in because I have freakishly large hands!  He just works his hands between the skin and the flesh until there is a nice, large cavity over the breast meat.  Then spread the butter mixture on the breast meat, but under that skin.  This ensures flavorful meat!  If you just spread the mixture on top of the skin, the skin will taste delicious, but the meat will not be seasoned or flavored.


Step 4


Quarter the onion and chop the celery into large sticks.  Place the turkey into a roasting pan, breast meat up.  I used the onion quarters and celery to help keep it securely upright.  Then pour the broth, remaining Dijon (2 Tbsp.) and lemon juice (1 Tbsp.) into the pan, around the turkey.  Whisk them to combine, briefly.  Add a nice sprinkling of salt and pepper to the top of the skin.  Then place the bird in the oven.

Step 5
We roasted it for 1 ¼ hours.  Then, I turned the heat up to 350 degrees for 15 minutes, just get the skin a little more browned.  Make sure you check the meat temperature before you removed it from the oven.  I look for 160 degrees because it will get to the desired 165 while it’s resting, covered in foil, for 15 minutes.  I find if I roast it to 165 and then remove it, the turkey is dry.

Step 6


After the turkey has roasted, it’s time to carve!  Make the horizontal and vertical cuts on each side of the breast bone, to remove both breasts from the bird.  Then slice it against the grain.  I don’t know why, but it stays more juicy and tender when sliced against, instead of with, the grain.  Serve the turkey with some of the pan juices spooned on top of the meat.

Enjoy!

Gastronome's Note:  I have a nonstick roasting pan, so it cleaned easily.  If yours is not nonstick, you may want to line the roasting pan with aluminum foil for easier clean up.

Monday, April 18, 2011

Devilish Eggs


Devilish Eggs
It’s that time of year!  The hard boiled eggs pile up in anticipation of some festive coloring.  My body seems to be perfectly in tune with the season because a deviled egg craving hit this weekend…and I listened to that craving.  I like big flavor in a deviled egg.  In my opinion, a great deviled egg has bold flavors that work with the richness of the yolk to make something almost decadent.  The ho-hum flavor of most potluck deviled eggs just doesn’t work for me.  As my husband put it, when he eats most deviled eggs, one is enough.  These flavor-packed deviled eggs have him reaching for more.  Give them a try – and feel free to adapt so they tickle your own taste buds!

Ingredients
6 Eggs
¼ Cup mayonnaise (I like Hellman’s Light mayo – less fat, but still really thick and creamy)
1 Tablespoon Dijon
1 Tablespoon prepared horseradish, drained after measuring
¼ Cup cheddar cheese, grated
Salt and Pepper
1 scallion, light and dark green parts
Paprika

Step 1
If your eggs aren’t already hard boiled, we need to get them there!  It seems everyone has their own method for hard boiling the perfect egg.  This is what I did and the yolks were all a beautiful yellow – no green rings.  But use your own tried and true method if you rather!  I put the six eggs in a pot and covered them with cold water until the water was about an inch over the eggs.  I put the pot over medium heat and brought it to a simmer.  Then I covered the pot and took it off the heat.  I let them sit for 9 minutes.  Then I drained the water and rinsed them with cold water.  When they were cool, they were ready to peel.  I tapped them my counted until the shell was cracked all around the egg and then peeled it.  It should come off rather easily.  Now they are ready to be deviled!


Step 2
Slice your hard boiled eggs in half.  Pop the yolks into a bowl.  Add the Dijon, horseradish, cheddar, salt and pepper.  You may want to add the horseradish and Dijon 1 teaspoon at a time.  As I mentioned, we like BIG flavor in our deviled eggs…your taste buds may beg to differ.  So start less and work your way to your perfect filling flavor!  Mix the ingredients together until it is a smooth, creamy mixture.


Step 3
Time to fill those little empty vessels!  They are begging for that rich, tangy mixture and it’s time to acquiesce to their request.  I piped the filling in with a star tip.  You could also put the filling in a zipper bag and cut a hole in the end for easy piping.  Or you can just spoon the filling into the egg.  It doesn’t matter how it gets there…it just needs to get there!


Step 4
Dust the filled eggs with paprika.  What can I say…it’s classic on deviled eggs.  Chop a scallion and scatter the light green and dark green parts on the eggs (the white of a scallion will overpower the flavors of the egg).


Enjoy!  Have fun with your deviled eggs.  Put your own favorite ingredients in the filling...there are no rules.  Make your own devilish variety!

Wednesday, April 6, 2011

Turkey Chili Soup


This dish was created at the grocery store.  When walking into the store this past weekend, we were trying to figure out what we wanted to make for Sunday dinner…we wanted something healthful that would provide some leftovers to eat on busy weeknights.  We thought about a white chicken chili we make with chicken breasts, but decided ground turkey sounded more “chili-ish”.  Without a recipe in hand, we walked through the store and selected ingredients we thought sounded good.  Thus, our Turkey Chili Soup was born.  And what a delicious result it was!  Take a look…

Ingredients
Olive oil
1 Pound ground turkey (I like using ground turkey breast)
1 Large onion, large diced
2 Jalapeno peppers, cleaned and small diced
1 Pobalano pepper, cleaned and large diced
1 Cup corn (I used frozen yellow)
3 (15 oz) cans beans (I used 2 cannellini and 1 pinto)
1 Tablespoon cumin
1 Tablespoon oregano
2 Teaspoons black pepper
½ Teaspoon crushed red pepper
6 ½ Cups chicken broth (I used unsalted stock)
Kosher salt to taste
1 Bunch Swiss chard, chopped
Sour cream, optional
Cheddar cheese, shredded, optional

Gastronome's Note:  We used a slow cooker, but you could easily make this on the stove.

Step 1
Begin, like I always do, by prepping the vegetables.  Large dice the onion.  When it comes to the peppers though, please be careful, especially the jalapenos!  I used gloves because of an incident I had the first time I chopped jalapenos.  It was for my sister’s graduation party and I was cleaning and dicing about 50 of them…gloveless.  My hands burned for days and the contacts I was wearing that day had to be tossed because they burned my eyes when I tried using them again!  So please, use caution!  Don’t be like me!  Remove as much of the veins and seeds as you like…that’s where the heat lives…so make it to your taste.  Small dice the jalapenos and large dice the poblano.

Step 2
Heat a medium sized saute pan over medium high heat.  Add some olive oil.  When it is hot, add the turkey and brown it.  It you have any excess fat when you are finished browning, just drain it off.

Step 3
Put the browned turkey, onion, peppers, corn, cumin, oregano, black pepper, red pepper and chicken broth in the slow cooker.  Drain and rinse the beans and then add them.  Add salt to taste.  Cover and turn to high heat for four hours.

Step 4
It should be bubbling and ever so fragrant by now.  Chop your Swiss chard and add it to the slow cooker.  It will begin wilting immediately when you stir it into the soup.  Let it heat through just a minute or two.  Then dish it up…doesn’t it look so healthful?!


Of course, I can’t stop there…I just had to reduce the low fat factor by adding some sour cream and shredded cheese…but oh how yummy it was!!!! J